ABS2
Training for experts
ABS2 is, besides Weider 6, the second most know training set for abdominal muscles. ABS2 is said to be a much more difficult training for experts. Some of the exercises are more difficult than W6 and require pretty good endurance. Furthermore, to train ABS2, you don't only need a piece of flat floor – you also need a training bar.
But if you've finished W6 and want to advance in your physical growth, ABS2 is for you.
It is said that this training have been invented by scientists from Stanford University in USA. They had been studying muscles and exercises for 6 years to come up with the best solution for sportsmen and body-builders.
Whether it is truth or not, ABS2 is a really good training set which makes you work hard and carves not only your your lower but also upper abdominal muscles and is safe for your spine.
The main advantage of ABS2 is that in not only develops the abdominal rectus but also other groups of abdominal muscles (in contrast to W6).
ABS2 – how to train
Below you will find the description of all the exercises from ABS2. Read about them and learn how to do them and after that move to the schedule. The schedule describes which exercises you do on given advancement level and in what sequence. Remember that ABS2 training is much more complicated than W6.
Exercise 1 – Leg thrust
Lay flat on your back. Hand along your body. You can also slide your hands under your back to have them on both sides of your tailbone (if you rise your hips a little, your back will comfortably lie on the floor).
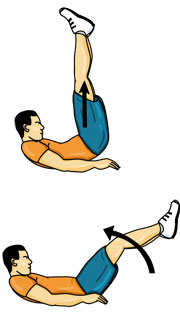 Now rise your head and shoulders a little (if you are not able to rise your shoulders you can just rise your head at the beginning). The position that you're in at the moment is your starting position. Just remember to check if your back is touching the floor.
Now start doing the exercise. It is explained below – even though it is in two phases, you should do them as one.
- Rise your legs to the horizontal position – it's best if your legs are bent only a little, but if you cannot hold them almost straight then bend them more.
- When your legs are in the horizontal position start rising your hips. The end of the motion is when:
- Your legs are in the vertical position.
- Your hips are as high as possible. - Now go back to the starting position – lower your hips and when your hips lie on the ground, lower your legs.
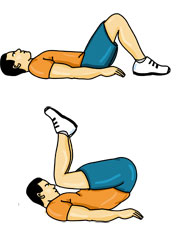
Exercise 2 – rising shoulders with legs up and bent
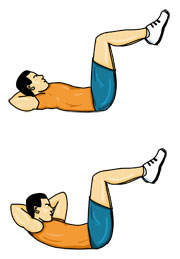 Starting position – you lie on the floor with your hands behind your head and your legs up and bent in knees in right angle.
Start moving your arms and shoulders up & down gain and again (remember that you back has to lie on the floor all the time).
It's important not to move ine the direction of your knees but rise your shoulders as high as possible. If this exercise gives you trouble you can try holding your hands straight up instead of holding them behind you head.
Exercise 3 – rising shoulders
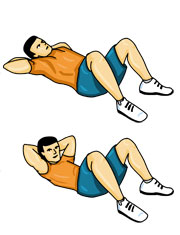 You starting position is lying on your back with bent legs and your hands behind you head.
Rise your neck and shoulders above the ground, wait a second and then lower them back.
You shouldn't rise them to high – your back has to touch the floor all the time. But remember that while rising your neck and shoulders they should stretch your abdominal muscles. Usually a good height for an average person is rising shoulders 4-8 inches above the ground.
Rise the neck and shoulders using only your abdominal muscles. Don't help yourself by pulling your head with your hands. If you catch yourself doing that, try to touch your temple with fingers instead of putting your hands behind youe head.
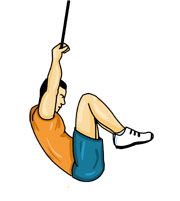
Exercise 4 – rising legs while hanging
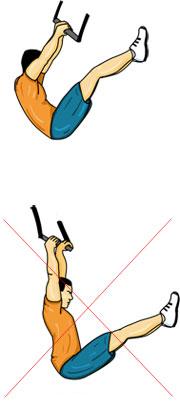 You need a bar to perform this exercise. It should be high enough so could able to hang freely without touching the ground with your feet. Most of us doesn't have that so we must practice on normal horizontal bars mounted in the frame of the door so we start the exercise with our legs bent. It doesn't affect the quality of the exercise but it makes it more difficult.
We use grip to hang. Hands on the bar should be in a comfortable distance – on the width of shoulders or even a little wider.
We start the rising of legs with a little bend of our back. We don't rise legs with our backs completely straight! Legs aren't completely straight – you have to bend them a little as well.
You have to rise and lower your legs slowly. This way you won't induce the swinging of the body. While rising our legs we do it with our abdominal muscles – don't swing your body to help yourself. It's not about number of series but about the development of your muscles. Every time you cheat you work against yourself.
Don't pull up yourself while doing this exercise – arms have to be straight and not involved in it.
When your knees are on the level of your chest, hold this position for at least one second.
If your hands are too weak to hold you long enough you can try helping yourself using bands or ribbons – you fix your hands to the bar with them or use them only to hold you under your armpits. But we encourage you to train the strength of your arms by doing pull ups or push ups.
Exercise 5 – rising bent knees while hanging
 This exercise is almost identical as last one. The only difference is that you have your knees bent in this one. Try to pull your knees as close to your chest as possible.
When you bend your knees you move the stress from lower abdominal muscles to upper abdominal muscles so it's actually a different exercise than exercise 4.
Exercise 6 – rising bent legs
 Start with lying flat on the floor with your legs bent. Put you hands along your body.
Now rise your knees and hips and try to touch your chest. Then lower your legs back to the starting but don't touch the ground with you feet.
Repeat this exercise again and again and remember not to touch the ground with your feet. You should do one rise very second.
Exercise 7 – trunk twists
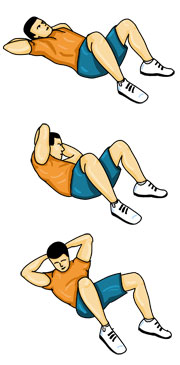 Trunks twists focus on developing oblique muscles.
You begin trunk twists with the same starting position as in exercise 3.
- Rise both shoulders.
- Twist your torso right, rising left hip simultaneously. Point your right elbow to your left knee. You should do it deeply and feel the stretch in your left side.
- You hold for about one second and get back to the starting position.
- Do the same exercise with your other side.
Now when you know all the exercises, get familiar with our training schedule and start exercising!
Good luck!